一、开始准备
- 布置画布:通过添加
<canvas>标签,添加canvas元素 - 获取画布:通过
<canvas>标签的id,获得canvas对象 - 获得画笔:通过canvas对象的getContext("2d")方法,获得2D环境
ps: canvas画布的大小只能在标签中或者js中设置
<!DOCTYPE html>
<html>
<head>
    <meta charset="UTF-8">
    <title>Canvas</title>
</head>

<body>
<div id="canvas-warp">
    <canvas id="canvas" width="800" height="600">
        你的浏览器不支持Canvas!
    </canvas>
</div>

<script>
window.onload = function(){
    var canvas = document.getElementById('canvas')
    var ctx = canvas.getContext('2d')
}
</script>
</body>
</html>
二、线段
- 移动画笔(moveTo())
如:ctx.moveTo(x,y)。这里的x,y为坐标,画布左上角的坐标原点是(0, 0),单位是px。 - 笔画停点(lineTo())
如:ctx.lineTo(x, y)。意思是从上一笔的停止点绘制到(x, y)。
这里要注意,
moveTo()和lineTo()都只是状态而已,是准备动作,是规划,还没有开始画。
- 设置画笔
- 设置画笔颜色
ctx.strokeStyle = '#f00'这里将画笔设置为红色。
ctx.lineWidth = 5这里将画笔粗细设置为5px。
- 确定绘制
有两种方法:
fill(),指填充。stroke(),指描边。
我们这里只是绘制线条,所以只要描边就好了。调用ctx.stroke()即可。
- 例子
下面是画一条坐标从(10, 10)到(100, 100)的宽为5px的红色线段。
<script>
window.onload = function(){
    var canvas = document.getElementById('canvas')
    var ctx = canvas.getContext('2d')
    ctx.strokeStyle = '#f00'
    ctx.lineWidth = 5
    ctx.moveTo(10, 10)
    ctx.lineTo(100, 100)
    ctx.stroke()
}
</script>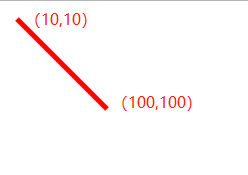
三、多条线段组成图形
- 绘制折线
只需要加多一个lineTo()就可以啦。
window.onload = function(){
    var canvas = document.getElementById('canvas')
    var ctx = canvas.getContext('2d')
    ctx.strokeStyle = '#f00'
    ctx.lineWidth = 5
    ctx.moveTo(10, 10)
    ctx.lineTo(100, 100)
    ctx.lineTo(10, 200)
    ctx.stroke()
}
效果如图: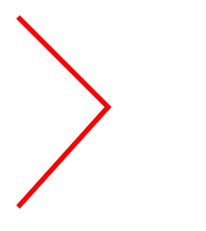
- 绘制多条折线
window.onload = function(){
    var canvas = document.getElementById('canvas')
    var ctx = canvas.getContext('2d')
    ctx.strokeStyle = '#f00'
    ctx.lineWidth = 5
    ctx.moveTo(10, 10)
    ctx.lineTo(100, 100)
    ctx.lineTo(10, 200)
    ctx.stroke()

    ctx.strokeStyle = '#000'
    ctx.moveTo(200,10)
    ctx.lineTo(300,100)
    ctx.lineTo(200,200)
    ctx.stroke()
}
效果如图: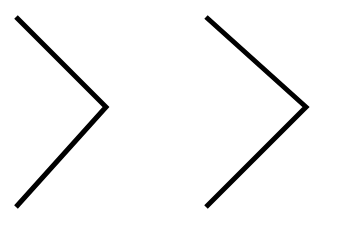
这里会发现,本来设置一条红色和一条黑色线的,都变成黑色了。
原因是:
Canvas是基于状态的绘制。
什么意思呢?其实这段代码每次使用stroke()时,它都会把之前设置的状态再绘制一遍。第一次stroke()时,绘制一条红色的折线;第二次stroke()时,会再重新绘制之前的那条红色的折线,但是这个时候的画笔已经被更换成黑色的了,所以画出的折线全是黑色的。换言之,strokeStyle属性被覆盖了。这里看到的两条折线,实际上总共绘制了三次,即第一次调用stroke时绘制了第一条红色折线,然后第二次调用stroke时同时绘制了黑色的两条折线。
- 使用beginPath()绘制
在每次绘制前调用ctx.beginPath(),代表下次绘制的起始之处为beginPath()之后的代码。
window.onload = function(){
    var canvas = document.getElementById('canvas')
    var ctx = canvas.getContext('2d')

    ctx.beginPath()
    ctx.strokeStyle = '#f00'
    ctx.lineWidth = 5
    ctx.moveTo(10, 10)
    ctx.lineTo(100, 100)
    ctx.lineTo(10, 200)
    ctx.stroke()

    ctx.beginPath()
    ctx.strokeStyle = '#000'
    ctx.moveTo(200,10)
    ctx.lineTo(300,100)
    ctx.lineTo(200,200)
    ctx.stroke()
}
效果如图: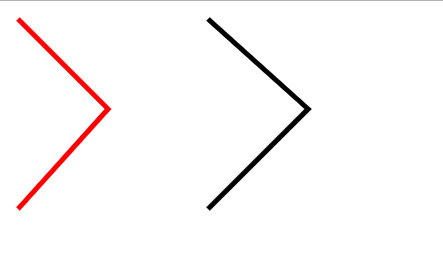
beginPath()是绘制设置状态的起始点,它之后代码设置的绘制状态的作用域结束于绘制方法stroke()、fill()或者closePath(),至于closePath()之后会讲到。
所以我们每次开始绘制前都务必要使用beginPath(),为了代码的完整性,建议大家在每次绘制结束后使用closePath()。大多数情况下不使用是没有什么关系的,但是使用的话可以增强代码的可读性以及意想不到的效果。
四、绘制矩形
- 使用closePath()绘制
可以直接用前面绘制折线的方法来绘制矩形,只需要最后一个坐标与第一个坐标相同。但会出现一个问题,在最后的重合点会出现缺口(不是完美闭合)。使用closePath()来解决
window.onload = function(){
    var canvas = document.getElementById('canvas')
    var ctx = canvas.getContext('2d')

    ctx.beginPath()
    ctx.strokeStyle = '#f00'
    ctx.lineWidth = 5
    ctx.beginPath()
    ctx.moveTo(100, 100)
    ctx.lineTo(300, 100)
    ctx.lineTo(300, 200)
    ctx.lineTo(100, 200)//最后一笔可以不画
    ctx.closePath()
    ctx.stroke()
}
效果如图: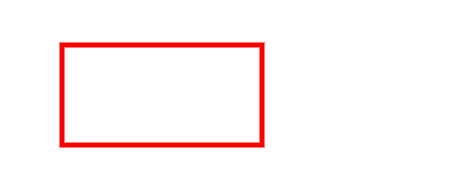
- 用fill()给矩形上色
window.onload = function(){
    var canvas = document.getElementById('canvas')
    var ctx = canvas.getContext('2d')

    ctx.beginPath()
    ctx.strokeStyle = '#f00'
    ctx.lineWidth = 5
    ctx.beginPath()
    ctx.moveTo(100, 100)
    ctx.lineTo(300, 100)
    ctx.lineTo(300, 200)
    ctx.lineTo(100, 200)
    ctx.closePath()

    ctx.fillStyle = 'yellow' // 选择油漆桶颜色
    ctx.fill()               // 填充
    ctx.stroke()
}
效果如图: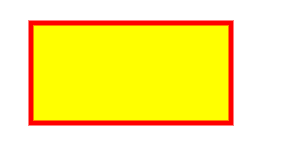
- 使用rect()方法绘制
canvas内置了画矩形的方法,ctx.rect(x,y,width,height);
window.onload = function(){
    var canvas = document.getElementById('canvas')
    var ctx = canvas.getContext('2d')

    ctx.beginPath()
    ctx.rect(100, 100, 200, 100) //直接画矩形
    ctx.fillStyle = 'yellow'
    ctx.strokeStyle = '#f00'
    ctx.lineWidth = 5
    ctx.fill()
    ctx.stroke()
}
效果和前面的一样。
- 快捷方法
fillRect(x,y,width,height),填充并画矩形
strokeRect(x,y,width,height),描边并画矩形
五、线条的属性
线条有四个属性:
lineCap:定义上下文中线的端点,可以有以下 3 个值。
butt:默认值,端点是垂直于线段边缘的平直边缘。round:端点是在线段边缘处以线宽为直径的半圆。square:端点是在选段边缘处以线宽为长、以一半线宽为宽的矩形。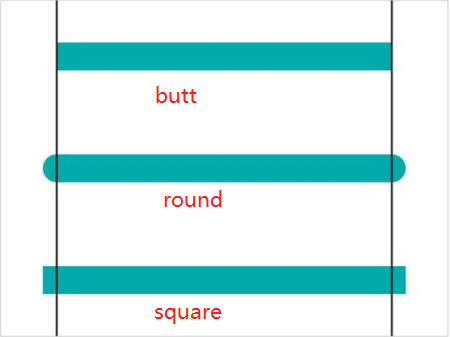
2.lineJoin: 定义两条线相交产生的拐角,可将其称为连接。在连接处创建一个填充三角形,可以使用 lineJoin 设置它的基本属性。
miter:默认值,在连接处边缘延长相接。miterLimit 是角长和线宽所允许的最大比例(默认是 10)。bevel:连接处是一个对角线斜角。round:连接处是一个圆。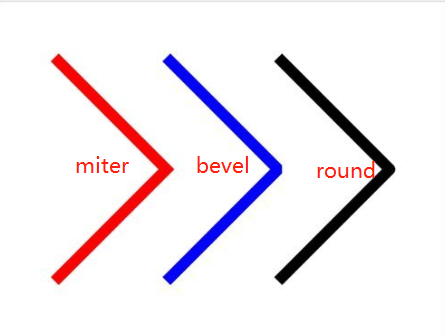
- lineWidth: 线宽,默认是1.0
- 笔触样式:strokeStyle 定义线和形状边框的颜色和样式。
六、填充颜色
- 基本颜色
ctx.fillStyle = 'red'
ctx.fillStyle = '#f00'
ctx.fillStyle = 'hsl(0,100%,50%)'
ctx.fillStyle = 'hsla(0,100%,50%,1)'
渐变颜色
(1) 线性渐变三步:添加渐变线,为渐变线添加关键色,应用渐变。
// 1.添加渐变线:
var grd = context.createLinearGradient(xstart,ystart,xend,yend);
// 2.为渐变线添加关键色(类似于颜色断点):这里的stop传递的是 0 ~ 1 的浮点数,代表断点到(xstart,ystart)的距离占整个渐变色长度是比例。
grd.addColorStop(stop,color);
// 3.应用渐变:
context.fillStyle = grd;
context.strokeStyle = grd;
举个栗子:
    var canvas = document.getElementById('canvas')
    var ctx = canvas.getContext('2d')
    // 添加渐变线,此处为矩形的左边边线,渐变将沿着这条线的方向进行(垂直方向)
    var grd = ctx.createLinearGradient(100,100,100,300)
    // 渐变颜色断点
    grd.addColorStop(0,'red')
    grd.addColorStop(0.5, 'blue')
    grd.addColorStop(1,'green')
    // 应用渐变
    ctx.fillStyle = grd
    ctx.fillRect(100,100,300,200) // 绘制矩形的快捷方法
效果如图: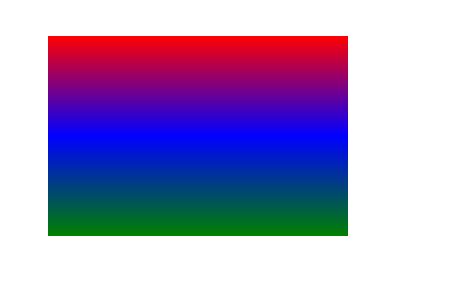
这里要注意,色彩是沿着渐变线的长度来分布的,感兴趣的可以研究一下渐变线坐标和长度都不同的情况。
(2) 径向渐变
类似径向渐变,只是第一个方法变了:var grd = context.createRadialGradient(x0,y0,r0,x1,y1,r1);
参数是两个圆,一般来说,两个圆心相同,半径不一样,渐变将是从圆心1指向圆心2。如果圆心不重合,将会组合成一些好玩的图形,请尽情玩耍。
    var grd = ctx.createRadialGradient(250,250,10,250,250,150)
    grd.addColorStop(0,'red')
    grd.addColorStop(0.5, 'blue')
    grd.addColorStop(1,'green')
    ctx.fillStyle = grd
    ctx.fillRect(100,100,300,300)
效果: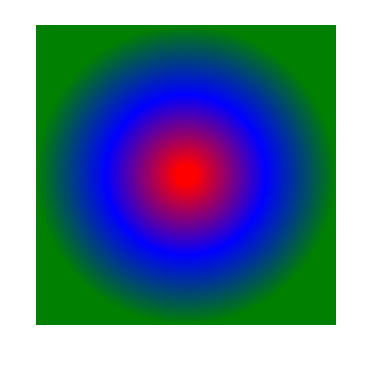
七、填充纹理
纹理就是图像的重复createPattern(img,repeat-style)
第一个参数可以是:img对象,canvas对象,vedio对象;
第二个参数可以是:repeat,repeat-x,repeat-y,no-repeat
    var canvas = document.getElementById('canvas')
    var ctx = canvas.getContext('2d')
    var img = new Image()
    img.src = 'edu8-1.jpg'
    img.onload = function () {
      var pattern = ctx.createPattern(img, 'no-repeat')
      ctx.fillStyle = pattern
      ctx.fillRect(100,100,500,300)
    }
八、绘制圆弧
- arc函数
context.arc(x,y,radius,startAngle,endAngle,anticlockwise)前面三个参数,分别是圆心坐标与圆半径。startAngle、endAngle使用的是弧度值,不是角度值。anticlockwise表示绘制的方法,是顺时针还是逆时针绘制。它传入布尔值,true表示逆时针绘制,false表示顺时针绘制,缺省值为false。
    var canvas = document.getElementById('canvas')
    var ctx = canvas.getContext('2d')
    ctx.strokeStyle = 'red'
    // 圆
    ctx.beginPath()
    ctx.arc(100,100,50,0,2 * Math.PI)
    ctx.stroke()
    // 半圆
    ctx.beginPath()
    ctx.arc(250,100,50,0,Math.PI)
    ctx.stroke()
    // 半圆逆时针
    ctx.beginPath()
    ctx.arc(400,100,50,0,Math.PI,true)
    ctx.stroke()
    // 0.5 pi
    ctx.fillStyle = 'red'
    ctx.beginPath()
    ctx.arc(550,100,50,0,0.5 * Math.PI)
效果:
- arcTo函数
arcTo(x1,y1,x2,y2,radius)5个参数,分别是两个切点的坐标和圆弧半径。这个方法是依据切线画弧线,即由两个切线确定一条弧线。因此需要至少三个点,要结合moveTo()或lineTo()使用。
    var canvas = document.getElementById('canvas')
    var ctx = canvas.getContext('2d')
    // 三点成直角
    ctx.beginPath()
    ctx.strokeStyle = 'red'
    ctx.moveTo(100,100)
    ctx.arcTo( 200, 100, 200, 200, 50)
    ctx.stroke()
    ctx.beginPath()
    ctx.strokeStyle = 'black'
    ctx.fillRect(100,100,3,3)
    ctx.fillRect(200,100,3,3)
    ctx.fillRect(200,200,3,3)
    ctx.stroke()
    // 三点成锐角
    ctx.beginPath()
    ctx.strokeStyle = 'red'
    ctx.moveTo(300,150)
    ctx.arcTo( 400, 100, 400, 200, 50)
    ctx.stroke()
    ctx.beginPath()
    ctx.strokeStyle = 'black'
    ctx.fillRect(300,150,3,3)
    ctx.fillRect(400,100,3,3)
    ctx.fillRect(400,200,3,3)
    ctx.stroke()
    // 三点成钝角
    ctx.beginPath()
    ctx.strokeStyle = 'red'
    ctx.moveTo(500,50)
    ctx.arcTo( 600, 100, 600, 200, 50)
    ctx.stroke()
    ctx.beginPath()
    ctx.strokeStyle = 'black'
    ctx.fillRect(500,50,3,3)
    ctx.fillRect(600,100,3,3)
    ctx.fillRect(600,200,3,3)
    ctx.stroke()
效果: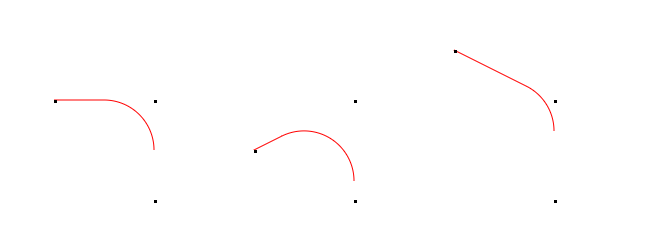
上面是圆弧半径为50的三种情况,黑色点是我特意加上去方便区分,按顺序两个点组成一条直线,圆弧在两条线相切显示。更多情况请自行组合。
九、贝塞尔曲线
Bézier curve(贝塞尔曲线)是应用于二维图形应用程序的数学曲线。 曲线定义:起始点、终止点、控制点。通过调整控制点,贝塞尔曲线的形状会发生变化。 1962年,法国数学家Pierre Bézier第一个研究了这种矢量绘制曲线的方法,并给出了详细的计算公式,因此按照这样的公式绘制出来的曲线就用他的姓氏来命名,称为贝塞尔曲线。
这里我们不介绍计算公式,只要知道贝塞尔曲线是一条由起始点、终止点和控制点所确定的曲线就行了。而n阶贝塞尔曲线就有n-1个控制点。
- 二次贝塞尔曲线
context.quadraticCurveTo(cpx,cpy,x,y);这里和acrTo()有异曲同工之妙。P0是起始点,所以通常搭配moveTo()或lineTo()使用。P1(cpx, cpy)是控制点,P2(x, y)是终止点。cpx和cpy有点难调,可以用在线工具直接获取:在线转换器
- 三次贝塞尔曲线
context.bezierCurveTo(cp1x,cp1y,cp2x,cp2y,x,y);
这里就多了一个控制点,在线转换器
十、变换
- 平移变换:translate(x,y)
x,y是相对于原来坐标的平移坐标
    var canvas = document.getElementById('canvas')
    var ctx = canvas.getContext('2d')

    ctx.fillStyle ='red'
    ctx.fillRect(100,100,200,100)

    ctx.save()
    ctx.fillStyle = '#000'
    ctx.translate(100,100)
    ctx.fillRect(100,100,200,100)
    ctx.restore()

    ctx.save()
    ctx.fillStyle = '#00f'
    ctx.translate(200,200)
    ctx.fillRect(100,100,200,100)
    ctx.restore()
效果: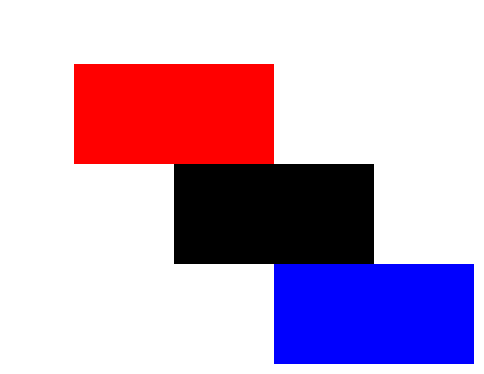
这里用到了新方法,ctx.save()和ctx.restore()。在每次平移之前使用context.save(),在每次绘制之后,使用context.restore()将坐标重置为原点。
- 旋转变换:rotate(deg)
参数deg是弧度,这个的旋转是以坐标系的原点(0,0)为圆心进行的顺时针旋转。所以,在使用rotate()之前,通常需要配合使用translate()平移坐标系,确定旋转的圆心。即,旋转变换通常搭配平移变换使用的。
    var canvas = document.getElementById('canvas')
    var ctx = canvas.getContext('2d')
    // 红色矩形
    ctx.fillStyle ='red'
    ctx.fillRect(100,100,100,50)

    ctx.save()
    ctx.fillStyle = '#000'
    ctx.translate(100,100) //将原点平移到红色矩形左上角
    ctx.rotate(0.25*Math.PI)// 顺时针旋转0.25pi,即45度
    ctx.fillRect(0,0,100,50)// 此时画矩形,坐标是原点
    ctx.restore()
效果: 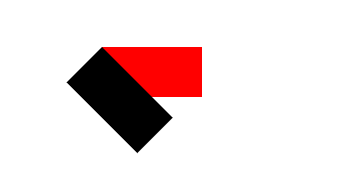
缩放变换:scale(sx,sy)
缩放变换scale(sx,sy)传入两个参数,分别是水平方向和垂直方向上对象的缩放倍数。例如context.scale(2,2)就是对图像放大两倍。需要注意两点:- 缩放时,图像左上角坐标的位置也会对应缩放。
- 缩放时,图像线条的粗细也会对应缩放。
- 矩阵变换:transform()
平移translate(),缩放scale(),以及旋转rotate()都可以通过transform()做到。
context.transform(a,b,c,d,e,f)| 参数 | 意义 |
|---|---|
| a | 水平缩放(1) |
| b | 水平倾斜(0) |
| c | 垂直倾斜(0) |
| d | 垂直缩放(1) |
| e | 水平位移(0) |
| f | 垂直位移(0) |
- 平移
context.transform (1,0,0,1,dx,dy)或context.transform(0,1,1,0,dx,dy)可代替context.translate(dx,dy) - 缩放
context.transform(sx,0,0,sy,0,0)或context.transform(0,sy,sx,0,0,0)可代替context.scale(sx, sy) - 旋转
context.transform(Math.cos(θ*Math.PI/180),Math.sin(θ*Math.PI/180), -Math.sin(θ*Math.PI/180),Math.cos(θ*Math.PI/180),0,0)或context.transform(-Math.sin(θ*Math.PI/180),Math.cos(θ*Math.PI/180), Math.cos(θ*Math.PI/180),Math.sin(θ*Math.PI/180),0,0)可代替context.rotate(θ)
总结transform
- 使用context.transform (1,0,0,1,dx,dy)代替context.translate(dx,dy)
- 使用context.transform(sx,0,0,sy,0,0)代替context.scale(sx, sy)
- 使用context.transform(0,b,c,0,0,0)来实现倾斜效果(最实用)。
十一、文本渲染和显示
步骤
- 使用font设置字体(不设置默认自动使用 10px 无衬线体)。
- 使用fillStyle设置字体颜色。
- 使用fillText()方法显示字体。
//1. 使用`font`设置字体。
context.font = "50px serif";
//2. 使用`fillStyle`设置字体颜色。
context.fillStyle = "#00AAAA";
//3. 使用`fillText()`方法显示字体。
context.fillText("《CANVAS--Draw on the Web》",50,300);fillText()与strokeText()的参数表是一样的,接受4个参数,分别是String,x,y与maxlen,其中String是指要显示的字符串,之后x与y是指显示的坐标,最后一个maxlen是可以缺省的数值型参数,代表显示的最大宽度,单位是像素。如果文本的长度超过了这个maxlen,Canvas就会将显示文本横向压缩。通常为了保证字体的美观,我们不设置maxlen。
即context.fillText(String,x,y,[maxlen])与context.strokeText(String,x,y,[maxlen])。
十二、文本对齐与度量
水平对齐textAlign
context.textAlign="center|end|left|right|start";垂直对齐textBaseline
context.textBaseline="alphabetic|top|hanging|middle|ideographic|bottom";文本度量measureText()
context.measureText(text).width;十三、阴影和透明
阴影
- context.shadowColor:阴影颜色。
- context.shadowOffsetX:阴影x轴位移。正值向右,负值向左。
- context.shadowOffsetY:阴影y轴位移。正值向下,负值向上。
- context.shadowBlur:阴影模糊滤镜。数据越大,扩散程度越大。
// 创建一个向右下方位移各5px的红色阴影,模糊2px,可以这样写
context.shadowColor = "red";
context.shadowOffsetX = 5;
context.shadowOffsetY = 5;
context.shadowBlur= 2;
全局透明globalAlpha
context.globalAlpha = 0.5;图像合成globalCompositeOperation
两个图像重合的时候,就涉及到了对这两个图像的合成处理。globalCompositeOperation属性设置或返回如何将一个源(新的)图像绘制到目标(已有)的图像上。
【HTML5】Canvas之globalCompositeOperation属性详解
十四、裁剪和绘制图像
裁剪
// 裁剪画布从(0,0)点至(50,50)的正方形
context.rect(0,0,50,50);
context.clip();
绘制图像drawImage()
drawImage()是一个很关键的方法,它可以引入图像、画布、视频,并对其进行缩放或裁剪。
一共有三种表现形式:
三参数:ctx.drawImage(img,x,y)
五参数:ctx.drawImage(img,x,y,width,height)
九参数:ctx.drawImage(img,sx,sy,swidth,sheight,x,y,width,height)
三参数的是标准形式,可用于加载图像、画布或视频;五参数的除了可以加载图像还可以对图像进行指定宽高的缩放;九参数的除了缩放,还可以裁剪。
| 参数 | 描述 |
|---|---|
| img | 规定要使用的图像、画布或视频。 |
| sx | 可选。开始剪切的 x 坐标位置。 |
| sy | 可选。开始剪切的 y 坐标位置。 |
| swidth | 可选。被剪切图像的宽度。 |
| sheight | 可选。被剪切图像的高度。 |
| x | 在画布上放置图像的 x 坐标位置。 |
| y | 在画布上放置图像的 y 坐标位置。 |
| width | 可选。要使用的图像的宽度。(伸展或缩小图像) |
| height | 可选。要使用的图像的高度。(伸展或缩小图像) |
示例: 给图片加一个新兴相框
<!DOCTYPE html>
<html lang="zh">
<head>
    <meta charset="UTF-8">
    <title>绘制心形相框</title>
    <style>
        body { background: url("./images/bg3.jpg") repeat; }
        #canvas { border: 1px solid #aaaaaa; display: block; margin: 50px auto; }
    </style>
</head>
<body>
<div id="canvas-warp">
    <canvas id="canvas">
        你的浏览器居然不支持Canvas?!赶快换一个吧!!
    </canvas>
</div>

<script>
    window.onload = function(){
        var canvas = document.getElementById("canvas");
        canvas.width = 800;
        canvas.height = 600;
        var context = canvas.getContext("2d");
        context.fillStyle = "#FFF";
        context.fillRect(0,0,800,600);

        context.beginPath();
        context.moveTo(400,260);
        context.bezierCurveTo(450,220,450,300,400,315);
        context.bezierCurveTo(350,300,350,220,400,260);
        context.clip();
        context.closePath();

        var img = new Image();
        img.src = "./images/20-1.jpg";
        img.onload = function(){
            context.drawImage(img,348,240,100,100);
        }
    };
</script>
</body>
</html>
十二、其他
context.save();
context.restore();
未完待续....
「一键投喂 软糖/蛋糕/布丁/牛奶/冰阔乐!」
(๑>ڡ<)☆谢谢老板~
使用微信扫描二维码完成支付
